In the Weeds with DTP
The basics of the direct-to-plate (DTP) process are simple: print directly on a photopolymer plate with an inkjet printer using only high-UV-blocking matte black to compose the image. The microscopic matte black ink dots block UV light, while any spaces between the dots are hardened. When the plate is washed out (etched) in water, the unhardened polymer underneath each black dot washes away and leaves the hardened polymer behind. This results in a topography of little polymer needles throughout the plate that hold the ink for making intaglio prints. The final print reproduces imagery in a continuous range of tones.
But with a little more investigation, there are several factors that can determine the amount of maximum image black that can be produced in a print made from the etched plate. The characteristics of the printer head, the dithering routine used in the printer driver, and the physics of the exposing light source all have an effect on the final resulting plate.
Overview
With Jet plates no longer available after their manufacturing facility shut down, we had to locate another source for photopolymer plates that would work well for doing polymer photogravure. I used the Jet plates for years and had very good luck with them.
I was reluctant to go back to the Toyobo KM product line because my past experience with those plates was not good. The Toyobo product has an unfortunate issue with sporadic and unpredictable mottling that I could never find a good way to rectify. The Toyobo plates were also were very picky about processing: they had to be dried thoroughly and quickly after washing out to avoid waterdrop marks. They also have a very noticeable ‘chemical’ stink when you are washing them out. My failure rate with those plates was unacceptably high.
We finally landed on the Fuji Torelief WS73 HX4 (aka HY3The Fuji Torelief plate material catalog is a confusing inscrutable mess with multiple names for the same material ) plates as being similar to the Jet material. The polymer compound (polyvinyl alcohol)in the Torelief plates is the same as the Jet product, which results in no odor, and no fussiness in processing and drying. The only knock on them is that exposures were slightly longer, and the plates seemed to have a little more plate tonePlate tone is a term printmakers use to describe the very thin amount of ink that is left on a plate in the very lightest parts of the image. Some printmakers wax lyrical over a subtle amount of plate tone, while others consider it the balm of Satan. than the Jet plates. The plate tone can be dealt with through ink selection and good wiping technique using a synthetic wiping fabric.
My prints made with Torelief plates looked the same as those made with Jet plates. I use an Epson P800 printer, and a densely packed 365nm UV-LED light box for exposing my DTP plates.
The Puzzle
Then, a friend brought in an Epson 3880 printer to calibrate for DTP. I used the same set of calibration steps I used for the P800, but I got some very strange results. My first test is always a simple one: I make a small plate using my calibration image that has 51 steps and print it using a lineara linear profile means that a 10% black in the image file directs the printer to lay down a 10% ink on the plate, and a 70% black in the image file directs the printer to lay down 70% ink on the plate, and so forth. matte black ink QuadToneRIP .quad file.
Typically this test should reveal a progression of gradually darker steps as more and more printer ink is laid down on the plate until a maximum black level is reached. Then, as more printer ink is added to the plate, so much light is blocked that it results in open biteOpen bite means that while the plate has been etched deeply, there are not enough fine polymer needles sitting in the etched-out area to allow the ink to stay in place as the plate is wiped. The result is an unappealing gray instead of a true black as the polymer is completely etched out.
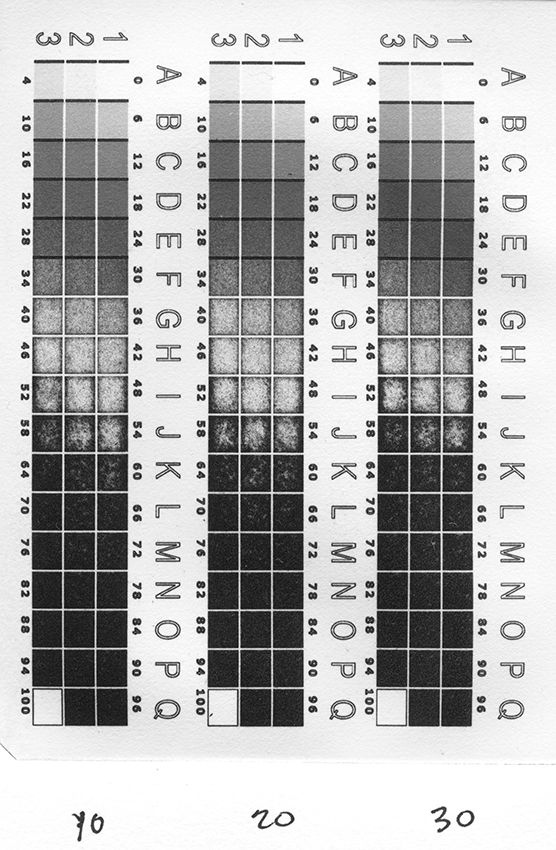
I made a print with this plate, and here is what I got:

WTF! That light area from 28%-62% was really weird. My exposure times went from 10 minutes to 30 minutes - plenty of time in my high output box.
I tried both less exposure and more exposure, changed the print resolution, even changed the dithering algorithm in QuadToneRIP, but I never could get a satisfactory black level. You can see in this test that starting at 28-30% matte black ink level the print densities start to decrease and go away completely until they start to creep back in at 64%. This just made no sense to me.
Of course, I could have picked 28% as my maximum matte black ink level for the plate, but that would result in a print with a Dmax of 1.1! Completely unacceptable!
A clue is found
My friend David Marsh had recently gotten a P900 printer to calibrate for DTP and I was sort of popping in and out of an email thread helping him get set up. He ran into a number of issues, but I remember one thing he tried that really helped him out was that instead of using 100% matte black ink, he found that a blend of matte black and photo black gave him the strongest blacks in his plates (or more accurately, the prints made from those plates).
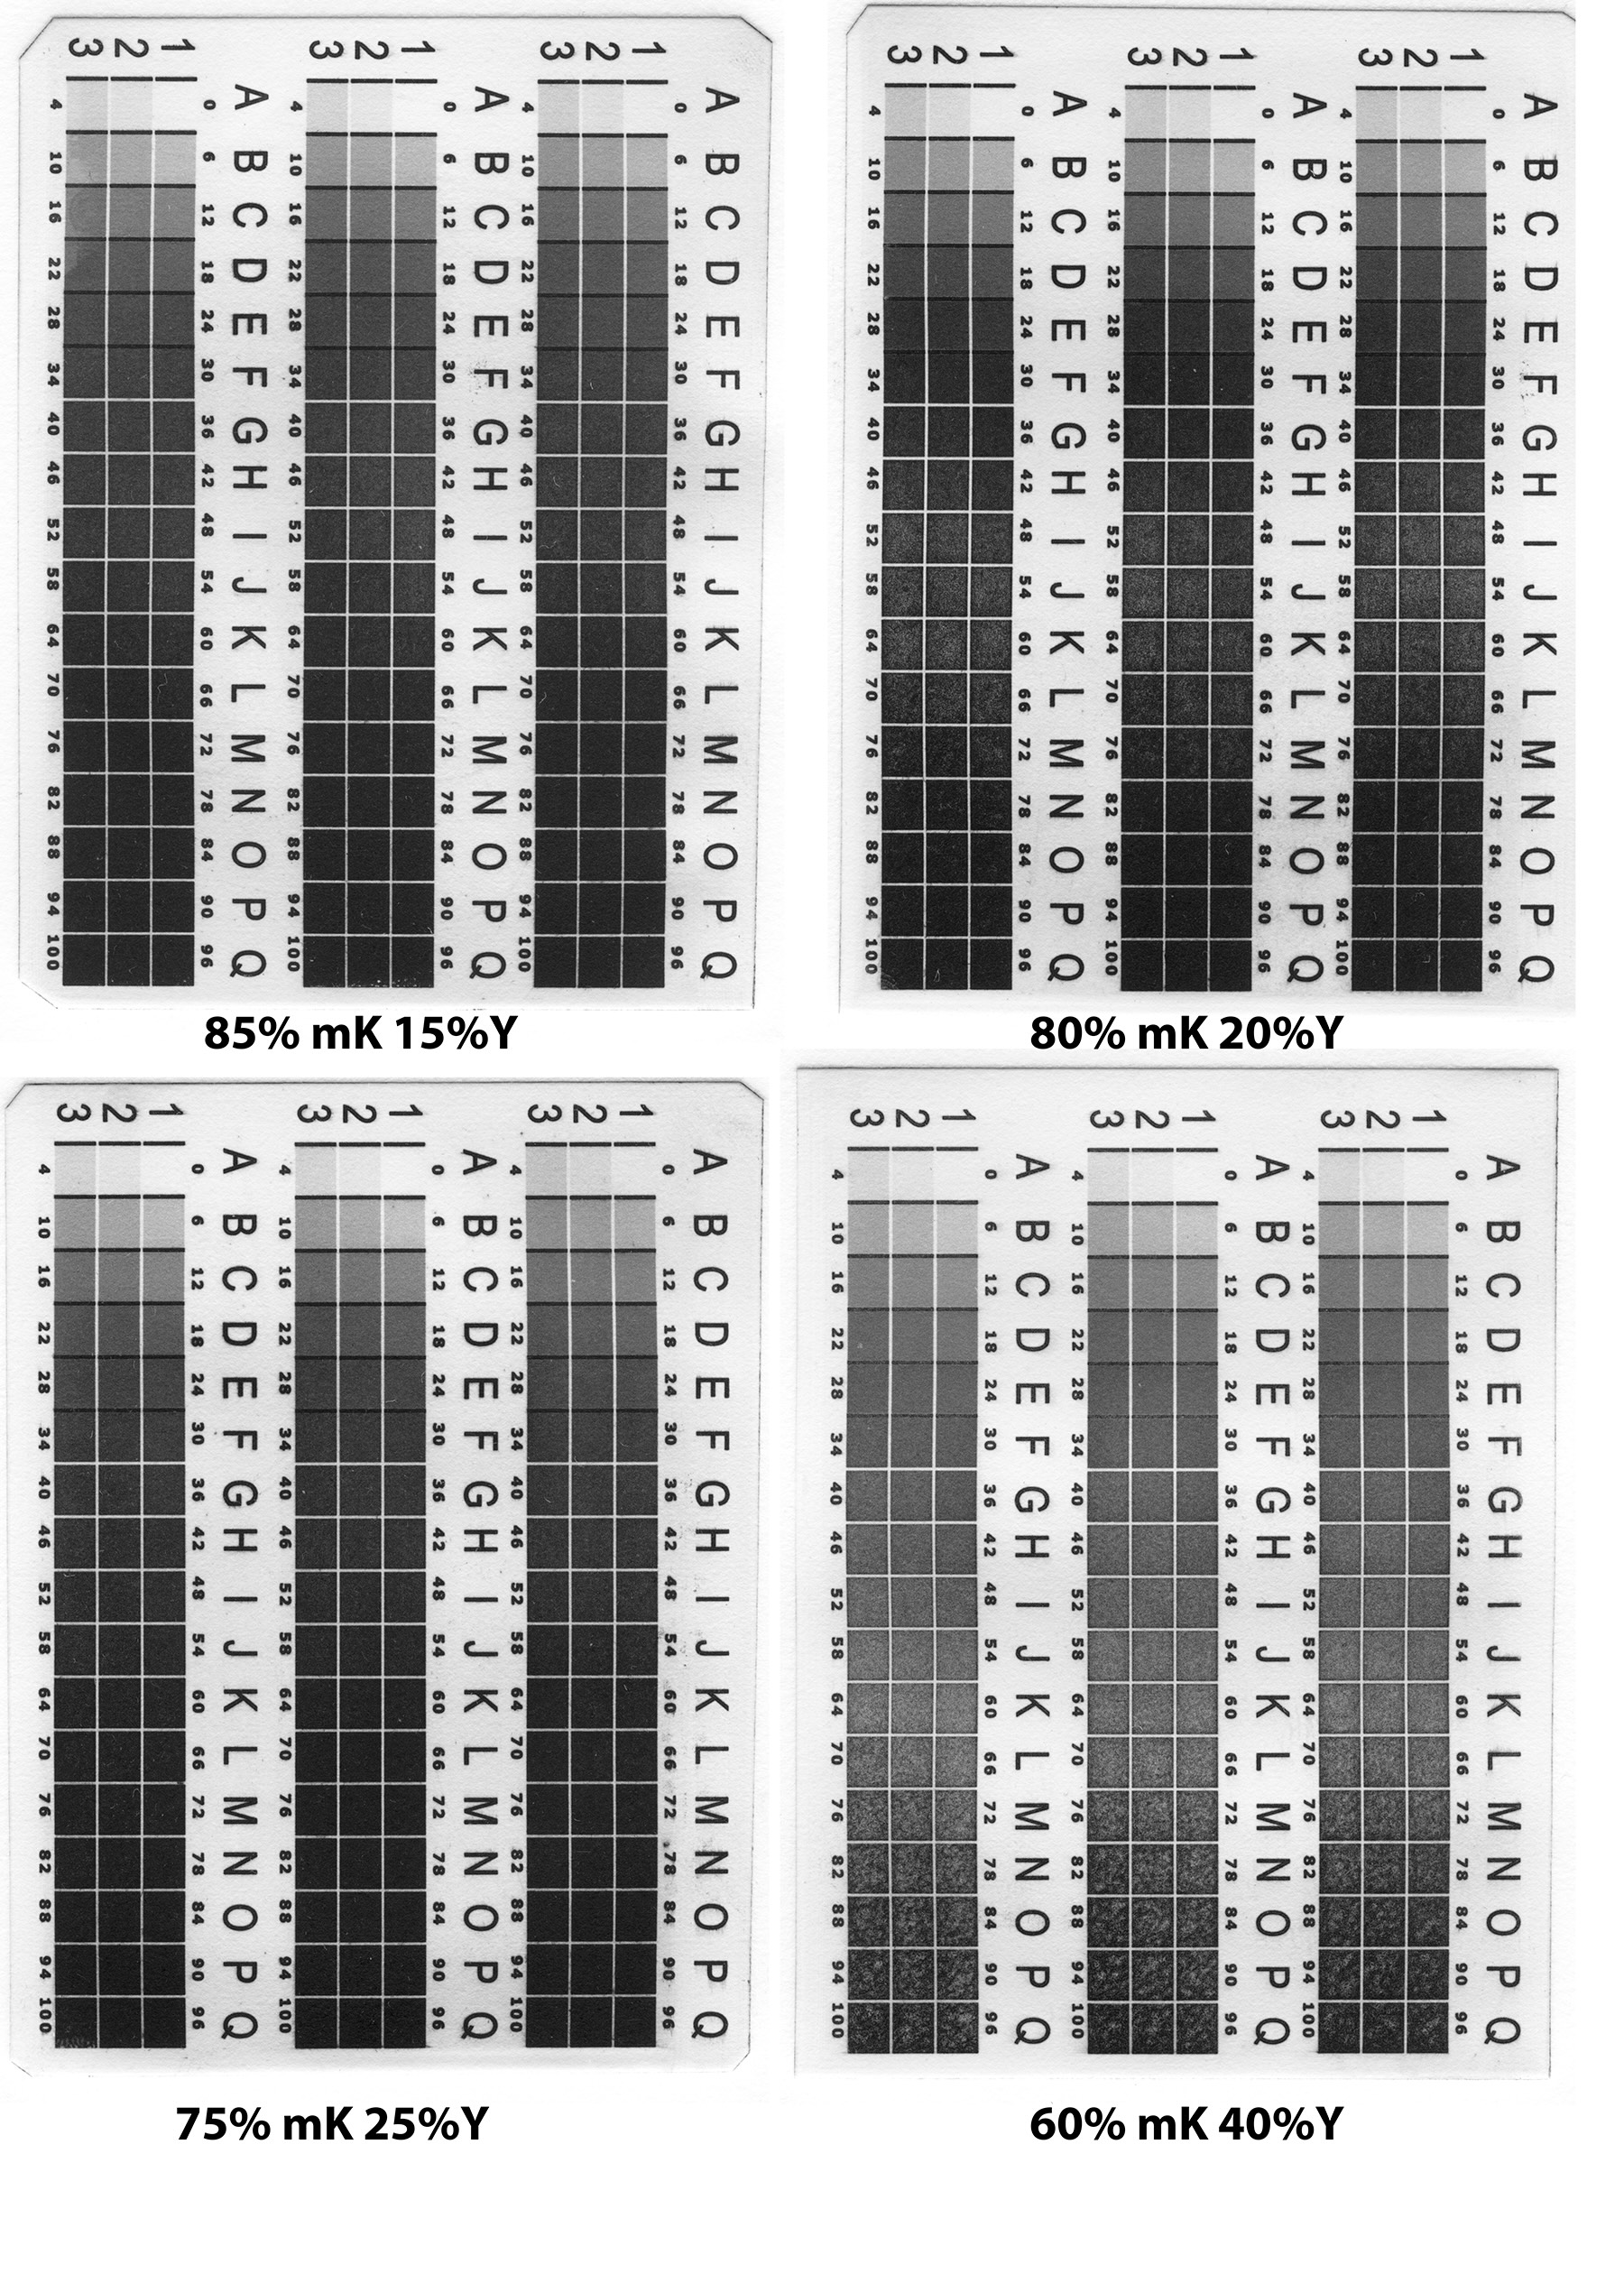
This blending of matte and photo black inks is not possible with the P800 and 3880, but I know from my digital negative experience that the Yellow ink is almost as effective at blocking UV as photo black. So I created a series of linear ink blends with different proportions of matte black and yellow ink. I printed the same linear test with each blend, and then evaluated the results:

As you can see, any amount of yellow ink improved the situation, but 75/25 mK/Y seemed to be the best combination without even a hint of that light band in the middle. I used a densitometer to pick the deepest black in the series of steps, which was a 1.5 at the 70% total ink level.
I used that total printer ink value to go through the linearization routine that I typically use. I won’t cover it here, but I will add another post in the future outlining that process. I got a perfect profile.
What is going on?
My theory on why this is happening is that the slightly less effective UV blocking yellow ink is allowing just enough additional light to penetrate around the dot-free areas, and enables the little aquatint needles to anchor to the steel substrate.
What I think is going on is that the middle lighter area in that original test is where the aquatint needles are present, but don’t have a robust enough base (or shoulder) next to the steel and they are getting knocked off during washout. This could be a similar to the ‘blow-down’ phenomena in carbon printing with imagesetter negatives.
The darker areas beyond that are where very little UV light is penetrating, but enough is penetrating that the surface contains some rugged ‘proto-needles’ that are able to hold the ink.
Or I could be wrong about all of that. All I know is that the yellow ink trick really works.
But wait, there’s more
I shared this information with my friend Matt Magruder, and he mentioned that he never has seen this phenomena with these plates, but that he exposes all of them with a metal halide Nuarc unit at Flatbed Press in Austin.
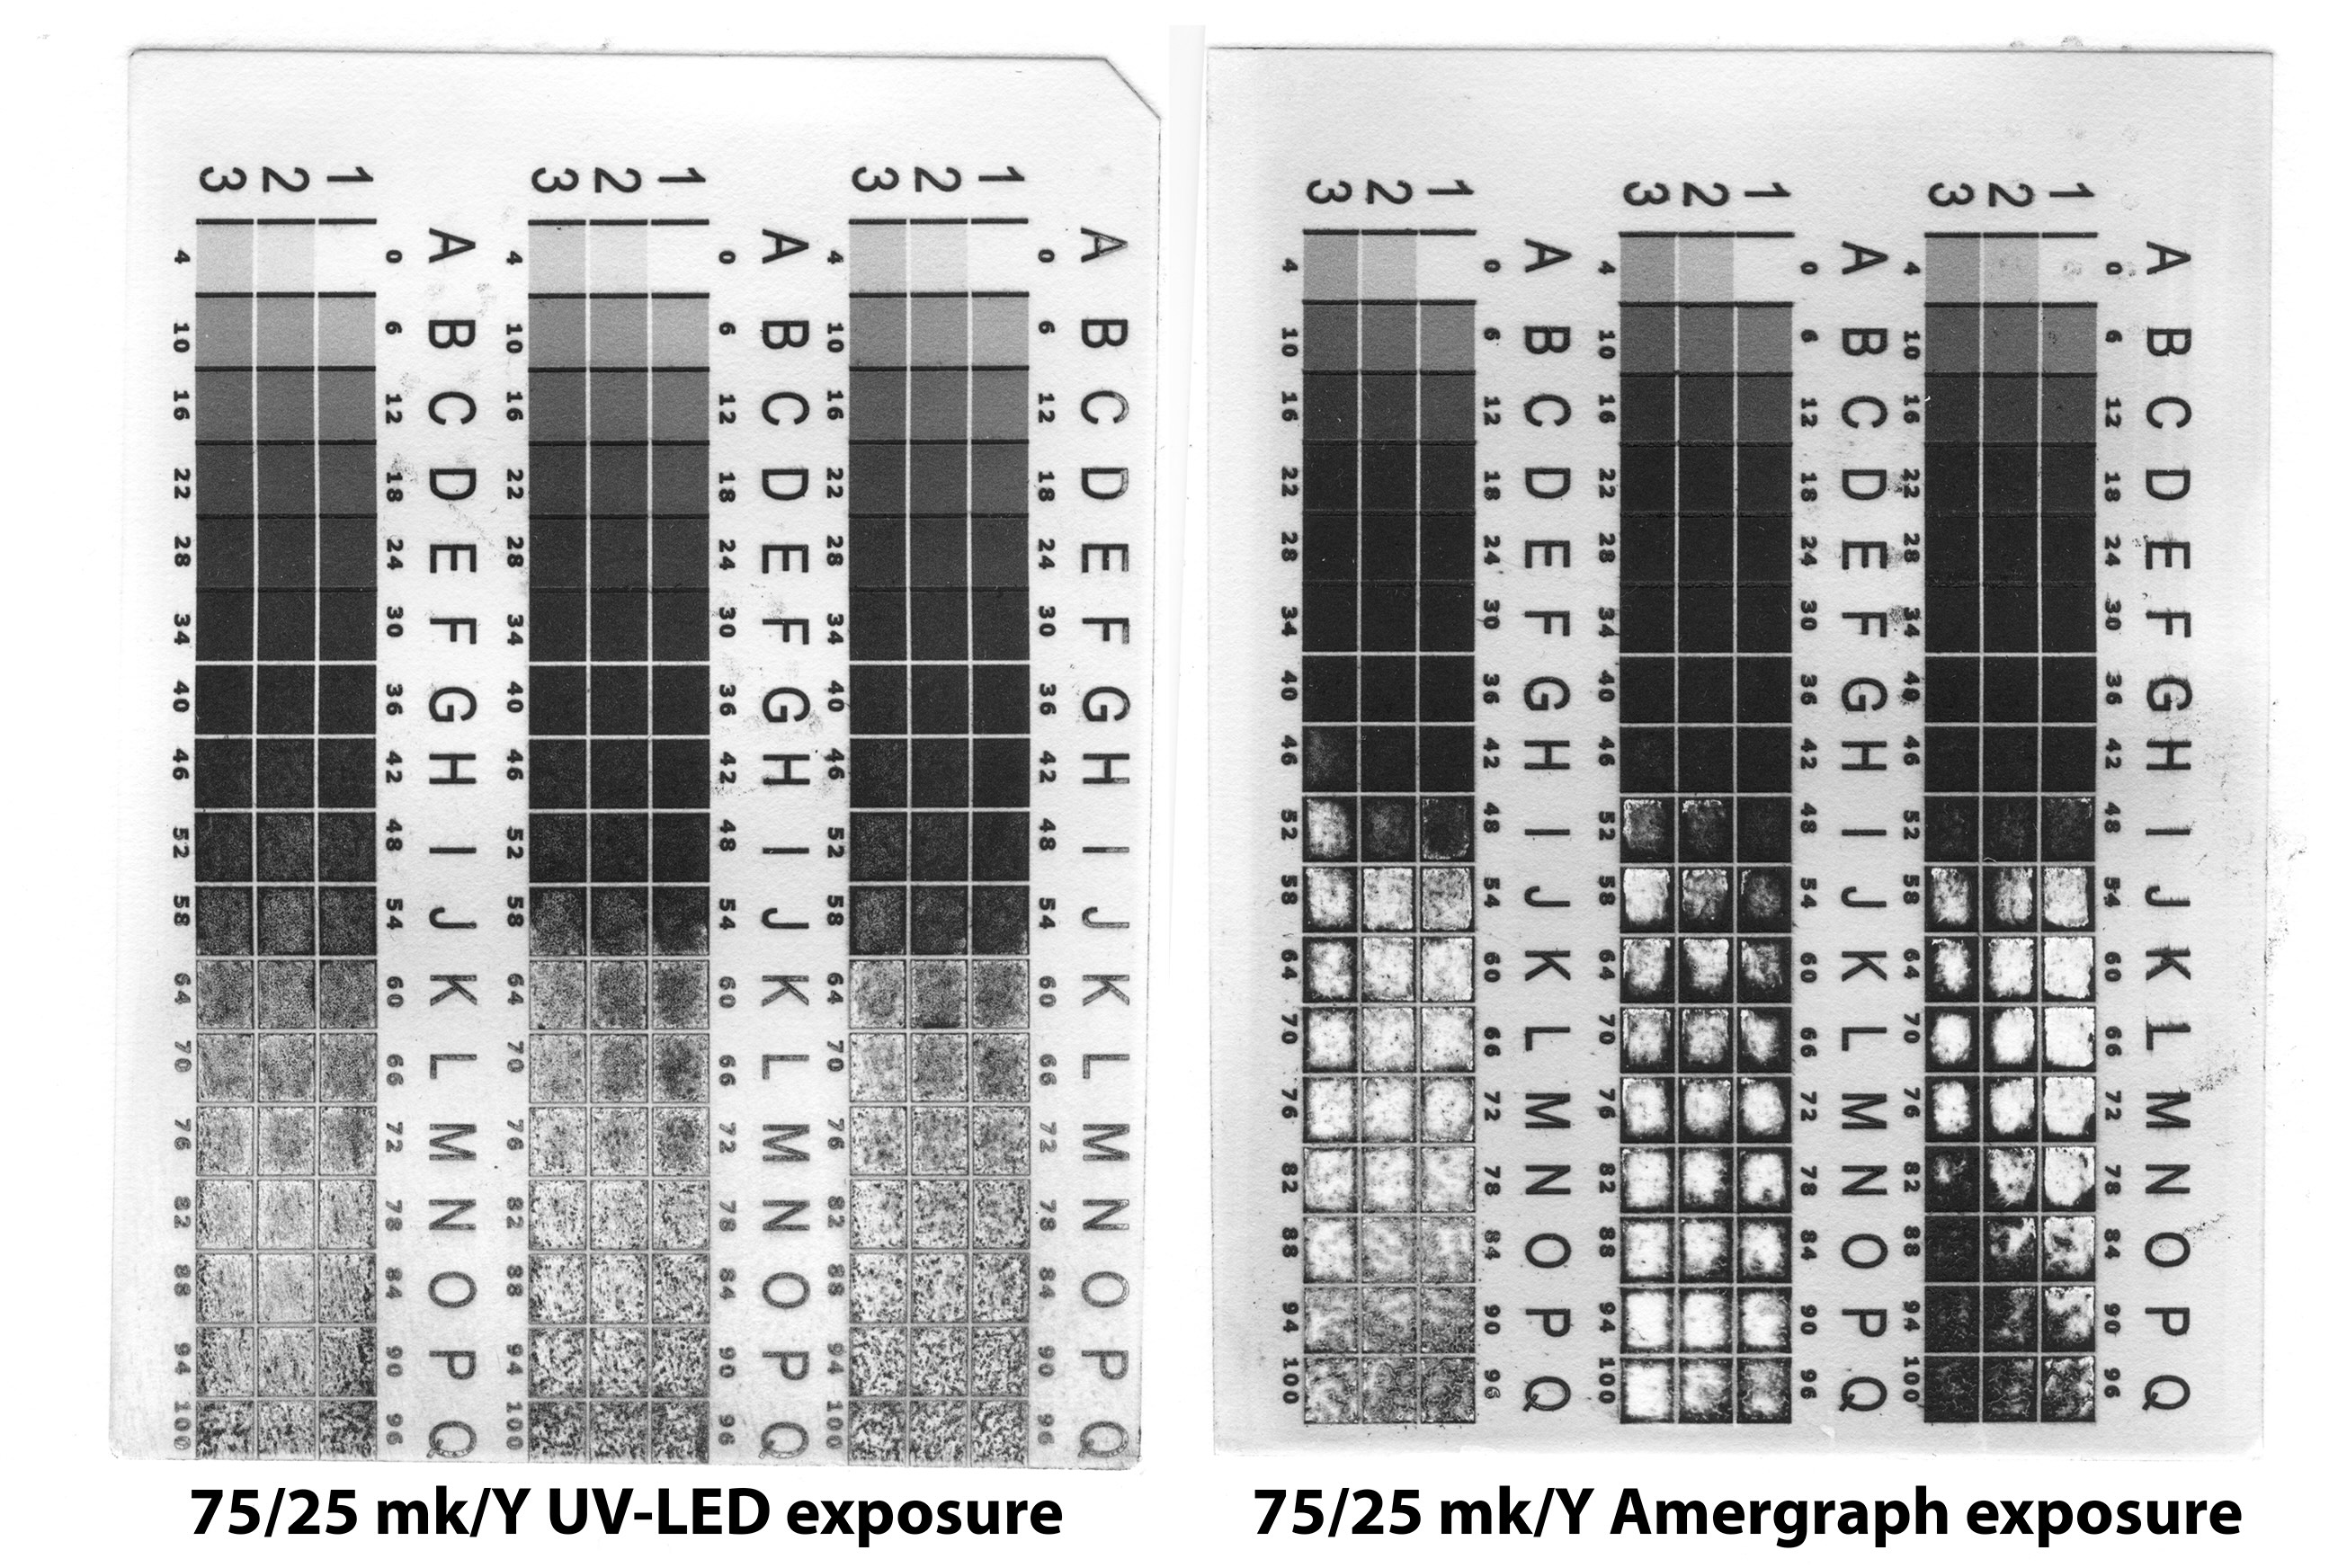
Crap. Another rabbit trail to start down. I ran a quick test comparing my UV-LED lights against my Amergraph metal halide exposure unit. And here it is:

The Amergraph’s light is more collimated than the UV-LED light. The emission angle on the LED diodes is fairly narrow, but not as narrow as the light from a metal halide exposure unit. As you can see, the Amergraph gets some really beefy black print values with low values of printer ink. Carrying this logic even further, a fluorescent tube exposure unit should be the worst light to use for DTP purposes. I’ll leave that investigation to a curious reader.
Conclusion
-
Don’t get caught up in the idea that DTP works with only matte black ink. A helper ink that is not quite as UV-opaque can be a useful addition when constructing a profile
-
The intensity of the light is only part of the equation when it comes to exposure for DTP photogravure. A box with double the space between strips will probably not be just half as fast, but more likely a lot less fast than that because the angle of emission in the overlapping illumination areas will be higher than a box where all the strips are spaced as closely as possible.
Resources
Test target download page
mK and Y blended .quad profiles for P800 and 3880
Download link: P800-3880 ink blend quad profiles
mK and pK blended .quad profiles for P900 printers
Download link: P900 ink blend quad profiles
