
Exercising your printer with Automator and crontab
The issue
A high quality printer is a significant investment for an enthusiast photographer. They are a marvel of modern technology, but the pro-level wide-format printers needed to print on the larger roll paper stock are designed to be used in a print-every-day production environment. The infrequent use that is common among enthusiast photographers can result in clogged print heads that may require ink-wasting power cleaning cycles, or in the worst case, an expensive printer head replacement to remedy.
The solution
Make a small print every day.
There, that was easy.
But… this solution doesn’t take into account human nature. It is very easy to forget to make a print every day. And if the printer owner is out of town for a week, or two, or three, the printer just sits there, with the ink slowly hardening inside the tiny holes in the print head.
The best solution is to automate the process and create a regularly scheduled print job initiated by the computer that will make a small print using all the print heads every two or three days. This set-and-forget approach is the same approach that is recommended for that other task that everyone knows they should do, but never quite get around to: backing up the data on your computer. Automation will save your ass for these necessary but tedious chores.
What is needed
-
Some cheap paper stock on which to print these head maintenance jobs. For printers that take cut-sheet paper, the lightly coated ‘photo quality inkjet paper’ that can be found at office supply stores is perfect. Just shop for the cheapest pack you can find. A 100-sheet pack will handle almost a year’s worth maintenance printing if the schedule is set to print every three days. Roll paper users could use something inexpensive like this.
-
An image to print. I have been using the Apple printing test page. It is a pdf file that can be found here.
-
A single-purpose app that will print the test page. In this tutorial, we will use the Mac OSX Automator scripting app to create this application.
-
A way of scheduling this app to run on a regular basis. We will use the unix-based crontab system application to schedule the app to run.
Step 1: Creating a single-use printing app
Automator is Apple’s drag-and-drop script creation app. There is an amazing amount of functionality that can be custom-built by users, and it is going to be used to create a standalone app that has one function: printing the test page.
First, download or create a test image that you intend to print. And drop it in a folder where you can find it again.
Next, open the Applications folder on your Mac and double click the Automator app.
Click File->New and a new window will pop open asking you to choose what type of Automator script you are building. Choose Application. In the selection panels on the left side of the scripting window, make sure the Actions button at the top is checked and then click on Files & Folders and then highlight-by-clicking on Get Specified Finder Items and drag that into the blank space to the right that is the script building area.
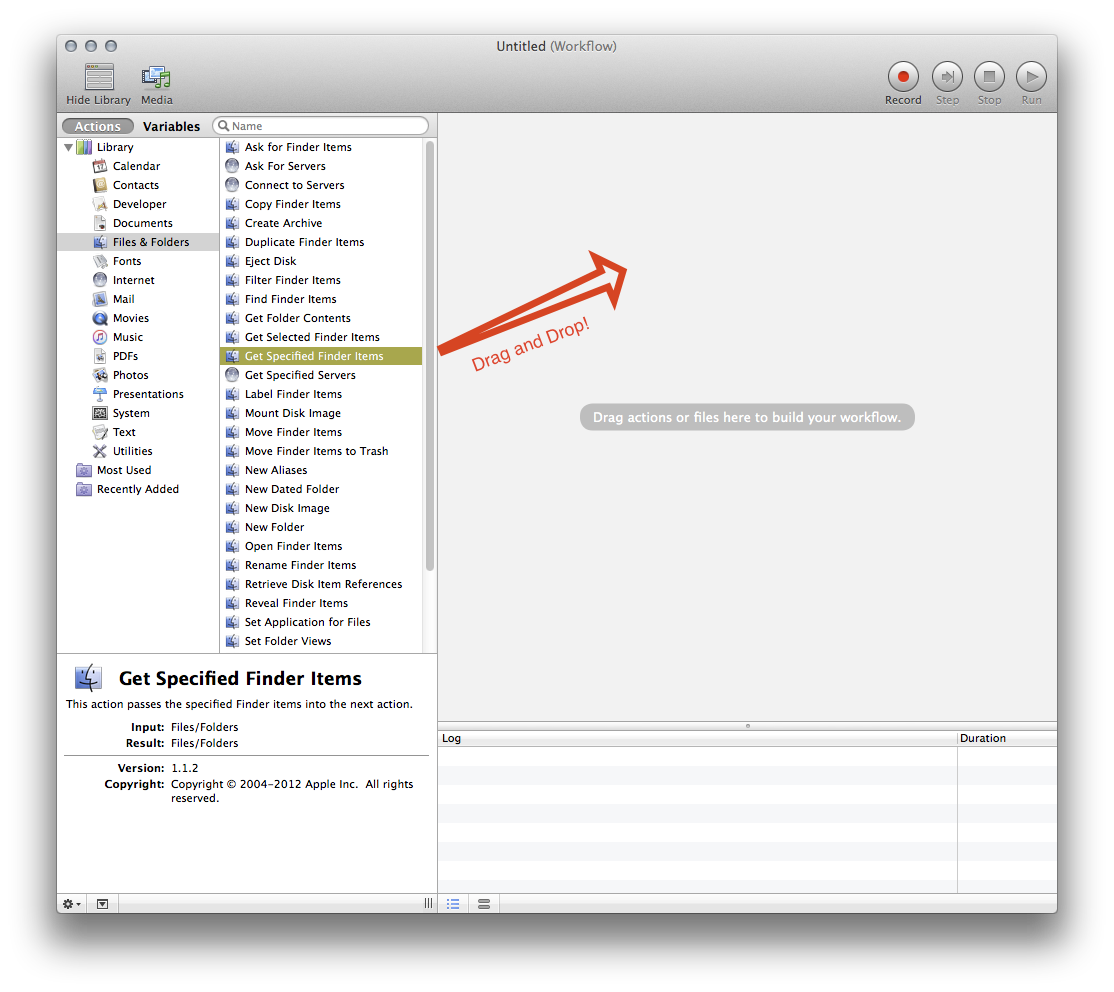
Click on the Add… button in the lower left part of the Get Specified Finder Items action that now appears in the right panel. Navigate to, and then select the file you intend to print.
Now add the final step to the script by selecting Utilities in the far left pane, then select-drag-and-drop Print Finder Items into the right panel.
Then select the printer you wish to print to using the drop-down dialog selector in that step in the action:
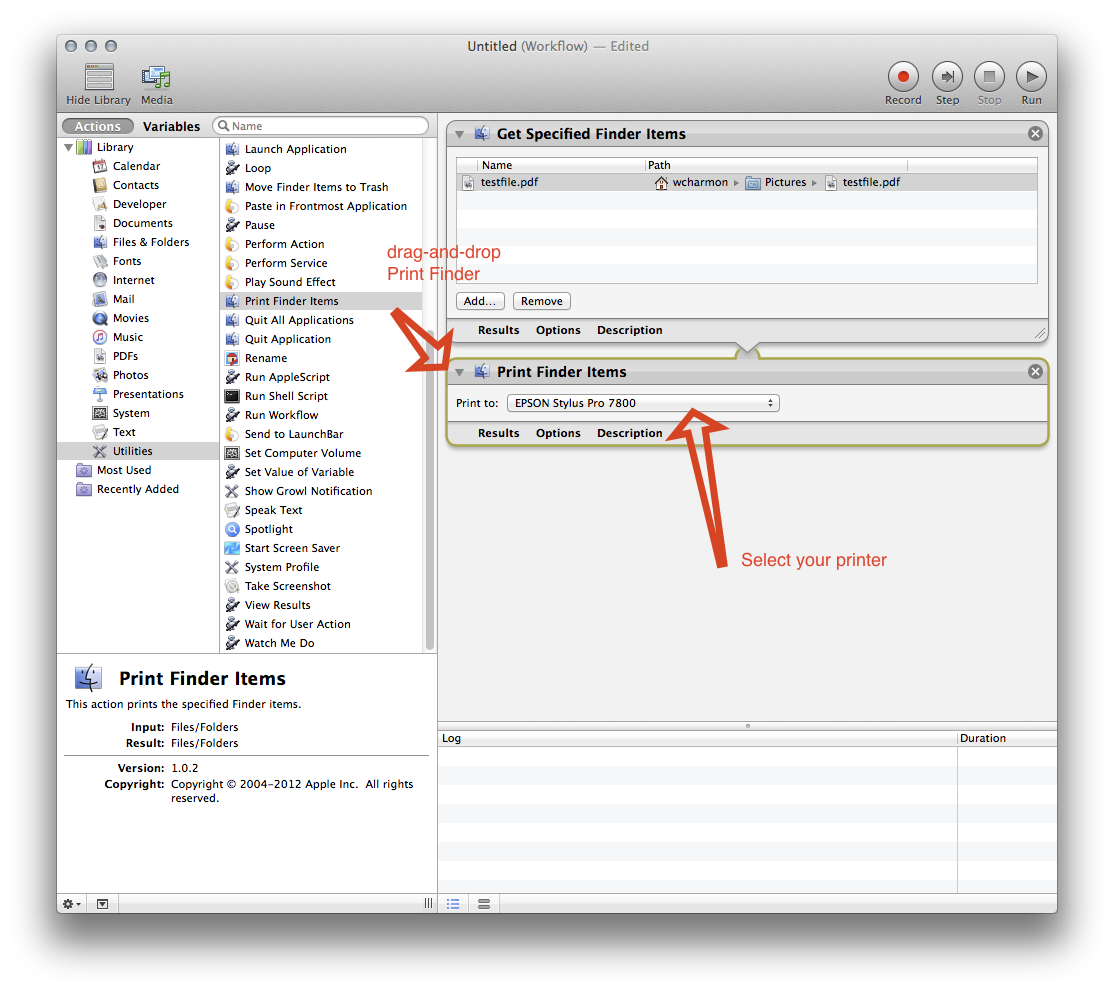
Now you have built an application that opens a specific file and prints it to a specific printer. Click on File->Save… and give it a name and save it in your Applications folder.
Step 2: Running the app on a schedule
Okay, fair warning here. This step will require you to open up a terminal window and do all sorts of ‘unix-y’ things. It is not hard, but it will undoubtedly bring back memories of green CRT terminals with clacky keyboards that were in college computer labs if you were doing this sort of stuff back in the seventies and eighties.
Mac OSX runs on Unix. The Apple graphical user interface just hides all the complexity from the normal user. But the beautiful part of OSX is that all of this incredibly powerful Unix functionality is still available by opening a terminal window and using the system’s command prompt.
Apple hides the terminal window app in the Utilities folder. Use finder to navigate to Applications/Utilities and double click the Terminal app to start it up.
Now we are going to use a special editor to create a file that will schedule and automatically run a program without the user having to do anything. We are creating a crontab file, and this is accessed by typing the following command at the prompt in the Terminal window you just opened:
env EDITOR=nano crontab -e
The syntax of this file is a sequence of five fields separated by a space followed by the command to run. The file fields at the beginning of each line indicate, in order, the minute, the hour, the day, the month, and the day of the week to run the command. All of the fields are numbers within the range of the variable they describe:
| Position | Variable | Range |
|---|---|---|
| 1 | minute | 0 - 59 |
| 2 | hour | 0 - 23 |
| 3 | day of month | 1 - 31 |
| 4 | month | 1 - 12 |
| 5 | day of week | 0 - 6 |
An asterisk indicates that the command should be run at all times meeting the rest of the criteria. Sequences of these variables are typed in as a comma separated list of numbers
So this line in your crontab file:
0 12 * * 0,2,4 run-the-thing
Means that at 12 noon (first two variables) on every day of the month and every month of the year (next two wildcard variables) as long as it is either Sunday, Tuesday or Thursday (the sequence of 0,2,4 for days of the week), the command ‘run-the-thing’ is initiated.
In my case, I wanted to exercise my printer every few days, so my crontab line looks like this:
40 8 1,4,7,11,14,17,21,24,27,30 * * `open /Applications/exercise7800\ scheduled.app`
Which translates to : run my exercise printer app at 8:40 on the 1st, 4th, 7th etc day of the month on every month of the year on every day of the week.
Once you are inside the crontab editor, you will see the Terminal window looking something like this:
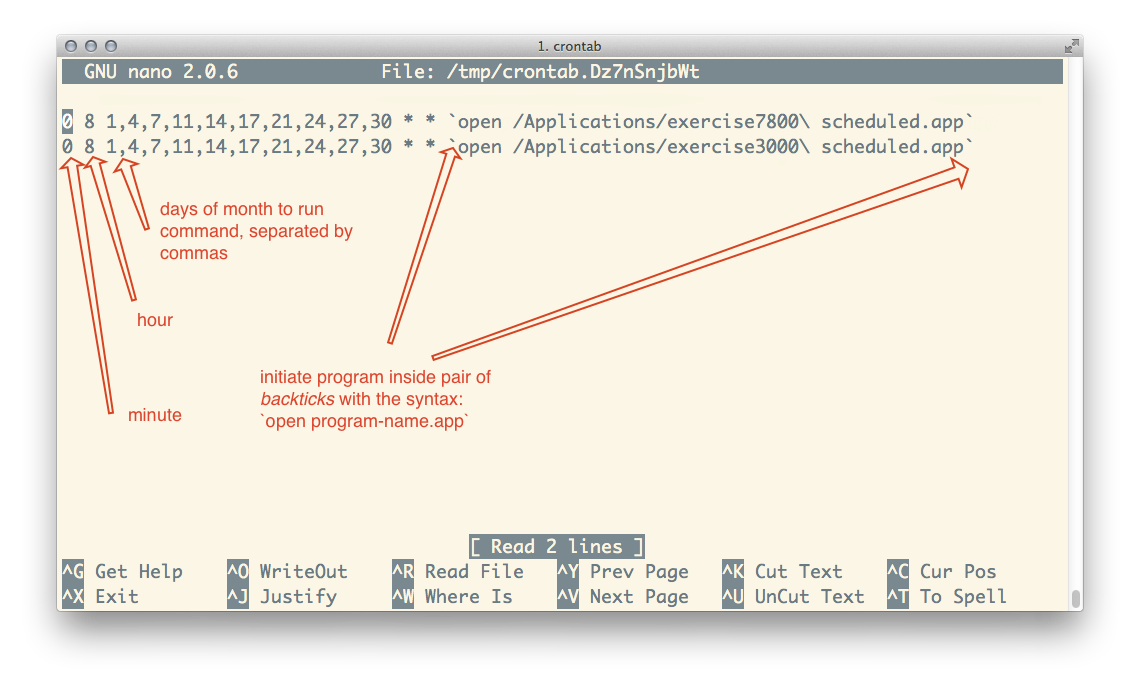
The command that you want to be initiated at the specified time has some peculiar requirements. First, you need to enclose the command in backticks. These are not single quotes, but the backtick key which is in the upper left of most keyboards. Secondly, it is not enough to specify just the program to run. On the Mac OSX system, you will need to prepend the app name with the command open.
So if the app you created using Automator is named printMyTest and is located in the Applications folder, the command to run it will look like this:
`open /Applications/printMyTest.app`
Once you have typed your the schedule and action into the crontab editor, save the file by typing ‘Control+O’ to write the file. Press enter to accept the file name (it will look like gibberish) and then type ‘Control+X’ to exit the editor.
I have two printers that need to be exercised, so I have created a separate single-purpose app for each printer. And I have added a second line to my crontab file to run the app on that second printer.
You can check what your current crontab apps are by typing crontab -l in the terminal, and it will return all the currently scheduled commands that will be run.
Final notes
You will need to keep your printer or printers loaded with the inexpensive paper you bought whenever you leave them idle. And keep in mind that these print jobs are dumb, and have no idea that you are in the middle of a printing session that uses expensive paper when they kick off their tasks. So you will likely want these jobs to run at 3 AM or some other time when you are not likely to be using the printer.